HTML Editor
This is part of the Stockashop Manual. It discusses the HTML editor used for editing pages and products within Stockashop.
FCK Editor
The HTML editor which Stockashop uses is a slightly customised version of the popular FCK Editor. You can refer to their comprehensive user manual available (though it's now called CK Editor) or refer to the guide below. The main differences between Stockashop's editor and FCK Editor are the choice of buttons available, and the image button on pages.
Disclaimer
The content you edit in the HTML editor may look different when displayed in your page. This is because your site has been styled (by your web designer) to use different colours and font sizes.
This is an intended effect, and can be very useful. For instance, if all your "Header 3"s are styled to be green, you just have to put in a "Header 3" into your page, and it will automatically be shown in green (even if it looks black in the editor). If you later tell your designer to change all those headers to red, it is a quick change requiring no re-editing on your part.
The differences may become especially apparent if you paste things from Word or emails, because they contain lots of hidden formatting which may interact with your site's styles in odd ways. We therefore recommend using the "paste as text" button when pasting from other software.
The Buttons

The image above shows all the buttons available for the main text area. The left and far right areas have a slightly condensed set - without the table, horizontal line or indenting. Products don't have the image button. The page below describes what each of the buttons do. If you don't like the editor you can click on the little black triangle in the lower right corner and it will hide itself away.
Copying and Pasting Buttons
 Edit HTML source: Allows you to edit the HTML source of the text. You need to be familiar with HTML which has lots of < and >, such as this for underlined text.
 Cut content: When you have highlighted something, you can cut it out of the page, making it available to paste in somewhere else. Sometimes, the browser won't let you use this button and you have to press Ctrl-X instead.
 Copy content: When you have highlighted something, you can copy it out of the page, making it available to paste in somewhere else. Sometimes, the browser won't let you use this button and you have to press Ctrl-C instead (as I just did for this sentence).
 Paste content: Clicking this will pop up a separate dialog box, which you can paste things into. When you click "OK", it will go into your page. To paste stuff without all that kerfuffle, press Ctrl-V. If your page doesn't look right after using this button, try "Paste as text" instead.
 Paste as text: This is a very useful button, because it allows you to paste things from other programs like Word or an email without any formatting. If, after pasting things into a page, they look all wrong, try pasting them using this button instead.
 Paste from Word: If you paste something from Word, this will let you remove some of the formatting and styles, but retain tables and things like that. If your page doesn't look right after using this button, try "Paste as text" instead.
 Select all: Clicking on this will select everything in the editor so you can delete it or copy it elsewhere.
Text Formatting Buttons
 Bold: Press this button to start typing in bold. Or highlight some text, and press this button to make it bold. Ctrl-B can have the same effect.
 Italicise: Press to start typing in italics. Or highlight some text, and press this button to make it italicised. Ctrl-I can have the same effect.
 Underline: Press to start typing underlined text. Or highlight some text, and press this button to make it underlined. Ctrl-U can have the same effect.
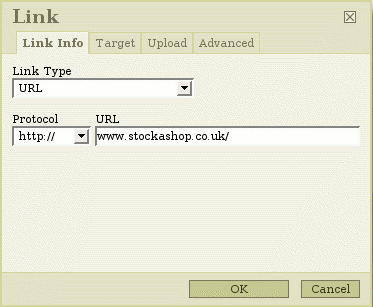
 Link: Use this to insert a link to another web page, or highlight some text and press the button to make the text into a link. Your visitors can then click on the link to visit the other web page. This pops up another box which is discussed below.
 Unlink: Click on an existing link, and this button becomes active, allowing you to remove the link.
 Table: This allows you to insert a table into your page. It initially asks you for the number or rows and columns, the width and height (in pixels), border, padding and spacing. Once a table is inserted, you can click on it to change the shape, and click on it with the right mouse button to add or delete cells, rows and columns. Tables look like this:
| Row 1, column 1 | Row 1, column 2 | Row 1, column 3 |
| Row 2, column 2 | Row 2, column 2 | Row 3, column 3 |
 Horizontal line: Insert a horizontal line into your page, like this:
 Image: This button lets you insert an image (aka picture or graphic) into your page. This button is not available for products, where the image is positioned automatically. The image must first be uploaded to the page. This button is discussed further below.
 Numbered list: This will turn your typing into a numbered list. To finish the list, press Enter twice. If you right-click on the list, you can change the properties to use letters or Roman numberals instead of plain old numbers. It looks liike this:
- First thing in the list
- Second thing in the list
 Bulleted list: As above but without numbers. You can change the properties to use a circle or square instead of a disc. It looks like:
- First thing in the list
- Second thing in the list
 Indent: This will indent your text, like this:
Indented text
 Unindent: This unindents indended text.
More Text Formatting and Size
 Format: This lets you insert various size headings into your text, as well as other types of formatting, all shown below. Headers are a very good way to break up the content of a long page, making it more readable for your visitors, and for search engines. You should generally not use the Header 1, as your page title is already one of these (an
in HTML). So Header 2 to provide your page with a second heading if needed, and then Header 3 and Header 4 to divide up the sections of a long page. Note that your text may look differently on your actual site than in this editor - that's because it can be effected by styling (CSS) put in place by the designer of your site.
Header 1 - already in your page
Header 2 - use this as a secondary heading
Header 3 - use this as headings for each section
Header 4 - and this for each sub section of your page
Header 5
Header 6
Formatted - uses a fixed size font
Address - used for showing addresses
Normal (DIV) - inserts a
 Size: This can change the size of text in your page. it is generally much better to use headings, as these provide search engines and screen reading browsers with a clue to how your page is organised. Smaller and larger just increase or decrease the size one notch. Again, the actual size these are displayed at depends on your site's stlying.
xx-small
x-small
small
medium
large
x-large
xx-large
Link box

When you press the Link button, the box above comes up. You just need to type the web page you want to link to into the "URL" box. You can also click "Target" to make the new web page open up in a new window. "Advanced" has lots of advanced options, like the "Advisory title" (the stuff that appears when you roll your mouse over a link).
Image box

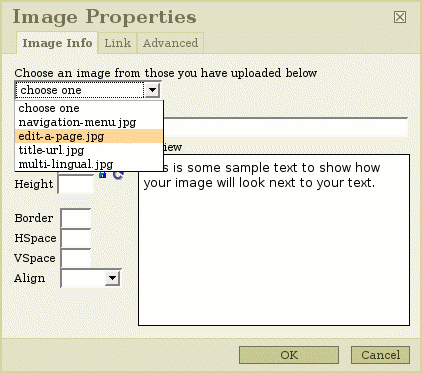
When you first upload an image to a page (using the "Page images" area when editing a page), it is automatically inserted at the beginning of your content. You can move and remove it by cutting, copying and pasting using the commands above.
If you want to insert multiple images into your page, you have to upload them separately in the "Page images" section. Then, when you press the Image button, all the images you have uploaded appear in a list at the top of the box, as above. Underneath the choice of image, you can fill in the "Alternative text" which is very important for search engines and screen reading browsers, or any other browsers which don't display images. You can also set the height, width, border, spacing and alignment of the image.
The "Link" tab lets you turn the image into a link and the "Advanced" tab lets you change advanced properties, such as the "Advisory Title" (the stuff that appears when you roll your mouse over the image, which can be different from the "Alternative text").
LOGIN AREA
CONTACT US TODAY?


